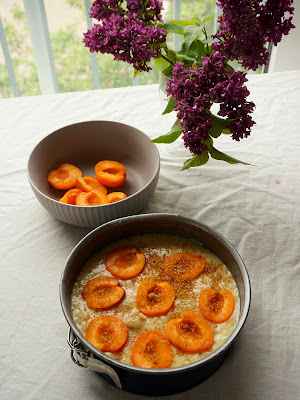
Raspberry Apricot Cake

The perfect cake for summer is soft, fluffy and has lots of fruits in it - at least, that is my opinion. I love topping it with vanilla whipped cream and serve it with an iced coffee. 

Now, if you would like to enjoy a cake like that - I would suggest you try this raspberry apricot cake. It's easy to make ( another one-bowl recipe, yay!), fluffy and soft, and involves the fresh flavors of raspberries and apricots. I top it with some brown sugar to make it even more delicious.

Because I am using an 18 cm / 7" pan, this cake bakes a long time in the oven. So, if you do not want to wait that long (which I can totally understand..) I would suggest using a larger pan.

The base recipe for this cake is by redcurrantbakery - I used her basic vanilla cake and made my twists accordingly. The original recipe is linked here.

If you want to see the full process of baking this cake, check out my Instagram Account @tamarasbakings for a "Bake with me" video of this cake.


RECIPE


Ingredients:

  • 2 eggs, room temperature
  • 175g sugar
  • 2 tsp vanilla extract
  • a pinch of salt
  • 100g yogurt (I used one with 3,8 % fat, the original recipe calls for full-fat Greek yogurt)
  • 90g vegetable oil
  • 50g milk
  • 150g flour
  • Baking soda & Baking powder: 1/2 tsp. each
  • 4 fresh, ripe apricots, cut in half
  • 60g frozen or fresh raspberries
  • some brown sugar (optional)
Instructions:
  1. Start by preheating your oven to 180°C/356 F and grease your baking tin with butter or oil. I used an 18cm/7" pan.
  2. Next, whisk together eggs, sugar, salt, milk, yogurt, and vanilla extract in a bowl.
  3. Add the oil, and whisk again.
  4. Then, add in the flour, baking soda as well as baking powder, and the frozen raspberries. I suggest you cover them in some flour before adding them to the bowl because otherwise, they sink to the bottom of your cake.
  5. Pour the cake batter into the baking pan. Then, put the halved apricots on top and sprinkle some brown sugar over them.
  6. Bake the cake for about 70-80 minutes. After a while, when it is golden brown but not quite baked through, you can cover the cake with some aluminum foil to prevent it from burning.
  7. Let the cake cool down, before slicing and serving with some whipped cream.
  8. Enjoy!


If you tried this recipe, make sure to tag me on your Instagram picture (@tamarasbakings)

For more sweet recipes, visit my recipe index or take a look at my Instagram account. I would love to welcome you as my new follower!


Popular Recipes

THE BEST BROWNIES: fudgy chocolate dream

Have you ever dreamed of fudgy, chocolatey Brownies?  Well, I have THE recipe that you're looking for. I changed some classic techniques and replaced a part of some of the most known ingredients to make the Brownies taste even better. So, if you want the perfect chocolate treat -jump to the recipe here. But I would appreciate if you read the following instructions to improve your Brownie -skills.  Let's go! What are the basic ingredients? For the perfect Brownies, you'll need: Butter and Coconut oil: the coconut oil gives the whole batter a really nice texture and makes the taste of the chocolate even more intense. Butter is one of the most basic but at the same time most important ingredients. To  create the fudgy consistency, we use melted butter and coconut oil . Chocolate: a Brownie without chocolate isn't a Brownie, right? So make sure to use high-quality chocolate with a high percentage of cocoa (70-80%). Sugar: I used a mixture of normal, g...

Do you want to learn how I create a short-form food video from start to finish?

I've been sharing my baking creations for more than five years on my Instagram Account @tamarasbakings . It all started with pictures but slowly, I transitioned into short-form videos, aka Reels. In the beginning, I made them very detailed and experimented with different settings in my home, various backdrops and camera angles, editing techniques, etc. but over time I created an effective way to film my Reels and now I am sharing multiple ones per month. Since I have the best followers in the world, I often get comments on how nice my editing is or how beautifully filmed my videos are. And I do pay close attention to the little details, like props and decor items, camera angles, and creating interest, so people genuinely want to watch my videos. This all being said, I think it is time to show you how I create my "bake with me"-Reels. And that is why I created a Skillshare course to teach you exactly that! In case you've never heard of Skillshare before, it is an onlin...

Cinnamon Rolls - perfect for fall baking

When I think of fall baking and the cozy season, I immediately think about cinnamon rolls, as well. There's just something so comforting about a soft, fluffy, and sweet cinnamon roll together with a cup of your fav fall drink. So today, I am sharing my favorite cinnamon recipe with you. I've always been using this exact recipe and I can confidently say that my whole family and friends love it! The yeast dough - things to keep in mind The most important thing about a good and fluffy cinnamon roll is, of course, the yeast dough- but how can you ensure it gets fluffy and perfect? First of all, I always use fresh yeast. In my opinion, this gives you the best results. In order to make sure the yeast can do its job properly, the temperature of the milk (and butter mixture) is key! If your mixture is too hot or too cold, you won't get a good yeast dough, it won't rise and your cinnamon rolls will be dry and flat. I always think of a hot bathtub when I heat my milk. Imagine you...