Smarties Cookies

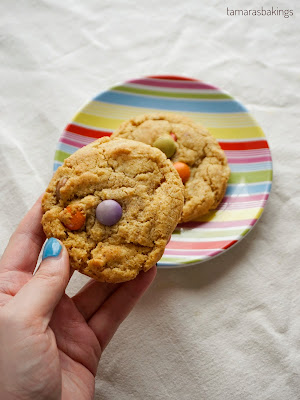
These fun and easy Smarties Cookies are so delicious and perfect for beginners. This recipe is a one-bowl recipe, which means less cleanup and easy preparation.

For our Smarties Cookies, we need browned butter, flour, baking soda, brown sugar, white sugar, salt, vanilla, one egg, and, of course, smarties.

Some cookie science before we start

I recently read "Baking Science" by Dikla Levy Frances and this book gave me a great insight into how baking works and which formulas you can apply to create your own recipes. Cookies are quite a complex thing to make, in my opinion, because the texture is affected by so many things.
I am using browned butter for my Smarties Cookies because it has a rich, nutty flavor and because melted butter leads to an even spread of the cookies.
Furthermore, using brown and white sugar has different purposes as well. Brown sugar is acidic, which means it reacts with the baking soda. It also leads to a chewy texture. White sugar, on the other hand, makes the cookies spread more.
The egg serves as a binding ingredient, and the flour obviously creates structure through gluten formation.
I am using salt and vanilla for extra flavor, too.


Why do I freeze my Smarties Cookies before baking

Placing your cookie dough in the freezer before baking can lead to enhanced flavors and it also makes the cookies spread less. Because the butter is colder, it takes longer to heat up in the oven. But I also do not want to wait overnight before eating my cookies, so chilling them for 30 minutes is the perfect time for me.

Let's start baking!


RECIPE:


Ingredients (for 17 cookies):

  • 150g butter
  • 250g all-purpose flour
  • 1/2 tsp baking soda
  • 200g brown sugar
  • 80g white sugar
  • a pinch of salt and some vanilla extract
  • 130g smarties
  • 1 egg (M)

Instructions:


  1. For the browned butter, cut the cold butter into small cubes and place them in a pot. Then, on medium heat, let the butter melt completely and continue to heat it until it turns golden brown. Immediately take it off the stove and transfer it into your mixing bowl.
  2. Next, I mix in the brown and white sugar, followed by the egg. Just make sure your mixture is not too hot, before adding the egg. 
  3. At this stage, I also add the vanilla extract.
  4. Mix in flour, baking soda and salt. Mix until almost incorporated, then add some chopped Smarties (I chop about 3/4 and leave the remaining 1/4 to put on top) and mix until everything is nice and combined.
  5. Using an ice cream scoop, form little balls out of the dough and top them with the remaining Smarties. Then place them in the freezer for about 30 minutes while preheating the oven to 180°C/ 365°F and lining a baking tray with parchment paper.
  6. Place 8-9 cookies on one baking tray and bake them for about 10-13 minutes until slightly golden.
  7. Let the cookies cool down and enjoy!


If you made this recipe, feel free to tag me on Instagram (@tamarasbakings) and check out my other sweet recipes here.


Popular Recipes

THE BEST BROWNIES: fudgy chocolate dream

Have you ever dreamed of fudgy, chocolatey Brownies?  Well, I have THE recipe that you're looking for. I changed some classic techniques and replaced a part of some of the most known ingredients to make the Brownies taste even better. So, if you want the perfect chocolate treat -jump to the recipe here. But I would appreciate if you read the following instructions to improve your Brownie -skills.  Let's go! What are the basic ingredients? For the perfect Brownies, you'll need: Butter and Coconut oil: the coconut oil gives the whole batter a really nice texture and makes the taste of the chocolate even more intense. Butter is one of the most basic but at the same time most important ingredients. To  create the fudgy consistency, we use melted butter and coconut oil . Chocolate: a Brownie without chocolate isn't a Brownie, right? So make sure to use high-quality chocolate with a high percentage of cocoa (70-80%). Sugar: I used a mixture of normal, g...

Do you want to learn how I create a short-form food video from start to finish?

I've been sharing my baking creations for more than five years on my Instagram Account @tamarasbakings . It all started with pictures but slowly, I transitioned into short-form videos, aka Reels. In the beginning, I made them very detailed and experimented with different settings in my home, various backdrops and camera angles, editing techniques, etc. but over time I created an effective way to film my Reels and now I am sharing multiple ones per month. Since I have the best followers in the world, I often get comments on how nice my editing is or how beautifully filmed my videos are. And I do pay close attention to the little details, like props and decor items, camera angles, and creating interest, so people genuinely want to watch my videos. This all being said, I think it is time to show you how I create my "bake with me"-Reels. And that is why I created a Skillshare course to teach you exactly that! In case you've never heard of Skillshare before, it is an onlin...

Cinnamon Rolls - perfect for fall baking

When I think of fall baking and the cozy season, I immediately think about cinnamon rolls, as well. There's just something so comforting about a soft, fluffy, and sweet cinnamon roll together with a cup of your fav fall drink. So today, I am sharing my favorite cinnamon recipe with you. I've always been using this exact recipe and I can confidently say that my whole family and friends love it! The yeast dough - things to keep in mind The most important thing about a good and fluffy cinnamon roll is, of course, the yeast dough- but how can you ensure it gets fluffy and perfect? First of all, I always use fresh yeast. In my opinion, this gives you the best results. In order to make sure the yeast can do its job properly, the temperature of the milk (and butter mixture) is key! If your mixture is too hot or too cold, you won't get a good yeast dough, it won't rise and your cinnamon rolls will be dry and flat. I always think of a hot bathtub when I heat my milk. Imagine you...